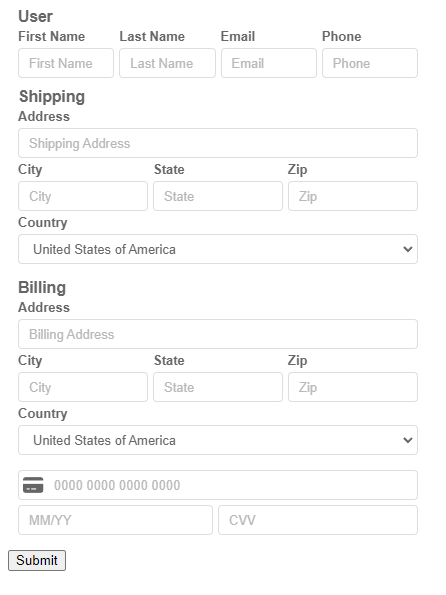
The Tokenizer API offers a secure solution for handling user payments by injecting hosted payment fields into a client’s website using JavaScript. This is achieved by embedding the payment page within an iframe, allowing businesses to handle transactions without being directly exposed to sensitive data, thereby staying outside the scope of PCI compliance. Once sensitive payment data is collected, it is tokenized, meaning that a secure, temporary token replaces the actual data. This token can then be used for further API calls, enabling seamless and secure payment processing. The token remains valid for a short window, typically two minutes, ensuring timely and secure transaction handling.
| Environment | Tokenizer JS CDN URL |
|---|---|
| Sandbox | https://tokenizer.taluspay-sandbox.com/tokenizer.js |
| Production | https://tokenizer.taluspay.com/tokenizer.js |
https://tokenizer.taluspay-sandbox.com
TIP:
Make sure you use a public API key that starts with pub_. This key is safe to include on the frontend of your website. Key can we grabbed from Get Merchant payment.tokenizer_publishable_key
TIP:
You can place the code that initializes the tokenizer (excluding the src import) in either the <head> or <body> of your HTML. Just ensure the container element you're referencing has loaded and can be accessed. Any string can be used as long as it can be selected with document.querySelector('#container'). The tokenizer will search for this element by using the selector you provide.
WARNING:
If you're working in a local development environment, be sure to set the correct URL for your API endpoint. Otherwise, the tokenizer will try to communicate with the current URL you're developing on.
DANGER:
Never expose the secret API key! This key should only be used in the backend of your application and must remain private.
IMPORTANT NOTICE:
After receiving a token, make sure to submit any API calls that involve sensitive information within 2 minutes, as tokens have a short expiration time.
<html>
  <head>
    <!-- Add tokenizer.js file to head or end of body based upon your application setup -->
    <script language="javascript" src="https://tokenizer.taluspay-sandbox.com/tokenizer.js"></script>
  </head>
  <body>
    <!-- Add div with id, that we will reference below, for where iframe form will go -->
    <div id="container" style="margin: 10px; max-width: 400px"></div>

    <!-- Add button to call submit -->
    <button onclick="example.submit()">Submit</button>

    <!-- Add script tag -->
    <script>
      var example = new Tokenizer({
        url: "", // Optional - Only needed if domain is different than the one your on, example: localhost
        apikey: "pub_1234567890", // Required - Your public key
        container: "#container", // Make sure that this "container" is the same as the id of the div container you referenced above.
        submission: (resp) => {
          console.log(resp);
        },
      });
    </script>
  </body>
</html>Tokenizer enables you to effortlessly capture user, billing, and shipping information within a single form. This data will be passed back to the submission callback as raw values.
var example = new Tokenizer({
  url: "", // Optional - Only needed if domain is different than the one your on, example: localhost
  apikey: "pub_1234567890", // Required - Your public key
  container: "#container", // Make sure that this "container" is the same as the id of the div container you referenced above.
  submission: (resp) => {
    console.log(resp);
  },
  settings: {
    user: {
      showInline: true,
      showName: true,
      showEmail: true,
      showPhone: true,
      showTitle: true,
    },
    billing: {
      show: true,
      showTitle: true,
    },
    shipping: {
      show: true,
      showTitle: true,
    },
  },
});
var example = new Tokenizer({
  url: "", // Optional - Only needed if domain is different than the one your on, example: localhost
  apikey: "pub_1234567890", // Required - Your public key
  container: "#container", // Make sure that this "container" is the same as the id of the div container you referenced above.
  submission: (resp) => {
    console.log(resp);
  },
  settings: {
    // Styles object will get converted into a css style sheet.
    // Inspect elements to see structured html elements
    // and style them the same way you would in css.
    styles: {
      body: {
        "background-color": "rgb(226 232 240)",
        padding: "10px",
        height: "105px",
      },
      input: {
        color: "#374975",
        "border-radius": "8px",
        "border-color": "#374975",
      },
      ".cc-icon": {
        color: "#374975",
      },
    },
  },
});